Bubble sketch stage
07 55987337 0418 747630
Hi All,in my previous post, I explained a bit about my business and a lot about the procedure of
getting houses designed, or duplex, apartments, eco resorts, ecovillages, additions and alterations etc.
I also wanted to explain how I go about designing a house as I know many of you will find this process interesting. So I started with a case study of our own residence which is located in "The Currumbin Ecovillage" http://theecovillage.com.au
Our home has been finished for over 5 years now and has been featured on TV and in documentaries - 7.30 Report, Totally Wild, Green Homes and Bacon and a German Doco. It has also featured in Best Abodes Book No.4, Panache Magazine, Gold Coast Bulletin Best 50 Homes (9th place) and various trade literature. It won 2009 BDAQ Regional Winner of Custom Designed Homes.
The ecovillage is a Multi Award winning world leading sustainable development. It has won over 32 International, National, State and Local awards including "The World's best Environmental Development" the FIABCI Prix D'Excellence Award 2008 and also the Australian Institute of Architects 2013 QLD Presidents Prize. Having designed over 30 homes here I like to think I had something to do with winning those awards....
I have been on the Architectural Review panel since it's inception, been chairman and have only recently resigned late 2013 after 6 years.
We purchased our block of land here in 2006, a moderately sloping block of land facing north with great views over a lot of the village and views of a pond to the west and a pond to the east, we have a hill protecting us to the rear which has a native hoop pine forest growing on it.
Basically it's an ideal orientation and is 760 sq.m size, with no fences and we have extra land all around us for growing fruit trees on. Some of which is Mango, Avocado, Banana, Paw paw, Lychee, Finger Lime, Mandarin and many more yet to plant (early days)...

So as explained briefly in the procedure part of my first blog we start off with a bubble sketch diagram of where we want the rooms roughly located. When we purchased the land we are given a Lot Evaluation which points out a few of the mandatory requirements, like where the garage is expected to go, the driveway, the setbacks from boundary, where we are expected to grow the vegies etc and where our more private garden areas might be. These are mainly guidelines but if you want to have the garage or driveway in a different spot you need to ask for a relaxation, same if you want to build over the setback lines.

The reason it's sensible is that the least desirable aspects for house design in australia is the south west,
because it's the hottest location in summer and the coldest location in winter. Typically us house designers try to locate the garages and services in that area. Garages, laundry and bathrooms
make a good buffer, or insulator for the more habitable rooms like living areas and bedrooms.
The design is now starting to take shape. I have the rooms in the right spot, but they aren't yet to scale and may need shifting once I have located the exact position of trees and setbacks etc.
In the top pavilion (north) I have a balcony to the left which capitalises on great views over a pond, our greenway that we share with our 4 neighbours in this hamlet, the creek and then over the village. This balcony blocks the summer western sun from our living room but still allows the winter sun in as the angle is lower. The living room also gets views over the village. Next we have the dining and kitchen, then a wall separating our main bedroom. You could say this pavilion is the main adult area and the kids are in the south pavilion.
Below it is roughly to scale. You will notice the red lines to each side which shows the boundaries and curved red lines show the half metre contours which shows the slope of the land.
Below is the north pavilion which contains the main living areas and master bedroom.

Below is the south pavilion which has the garage to the west and bedroom 2 to the east. Bed 3 only has a view over the courtyard and south to bush. Oh well, she had the best view in the last house.
It's still early on in the design development stage and many changes are yet to occur.

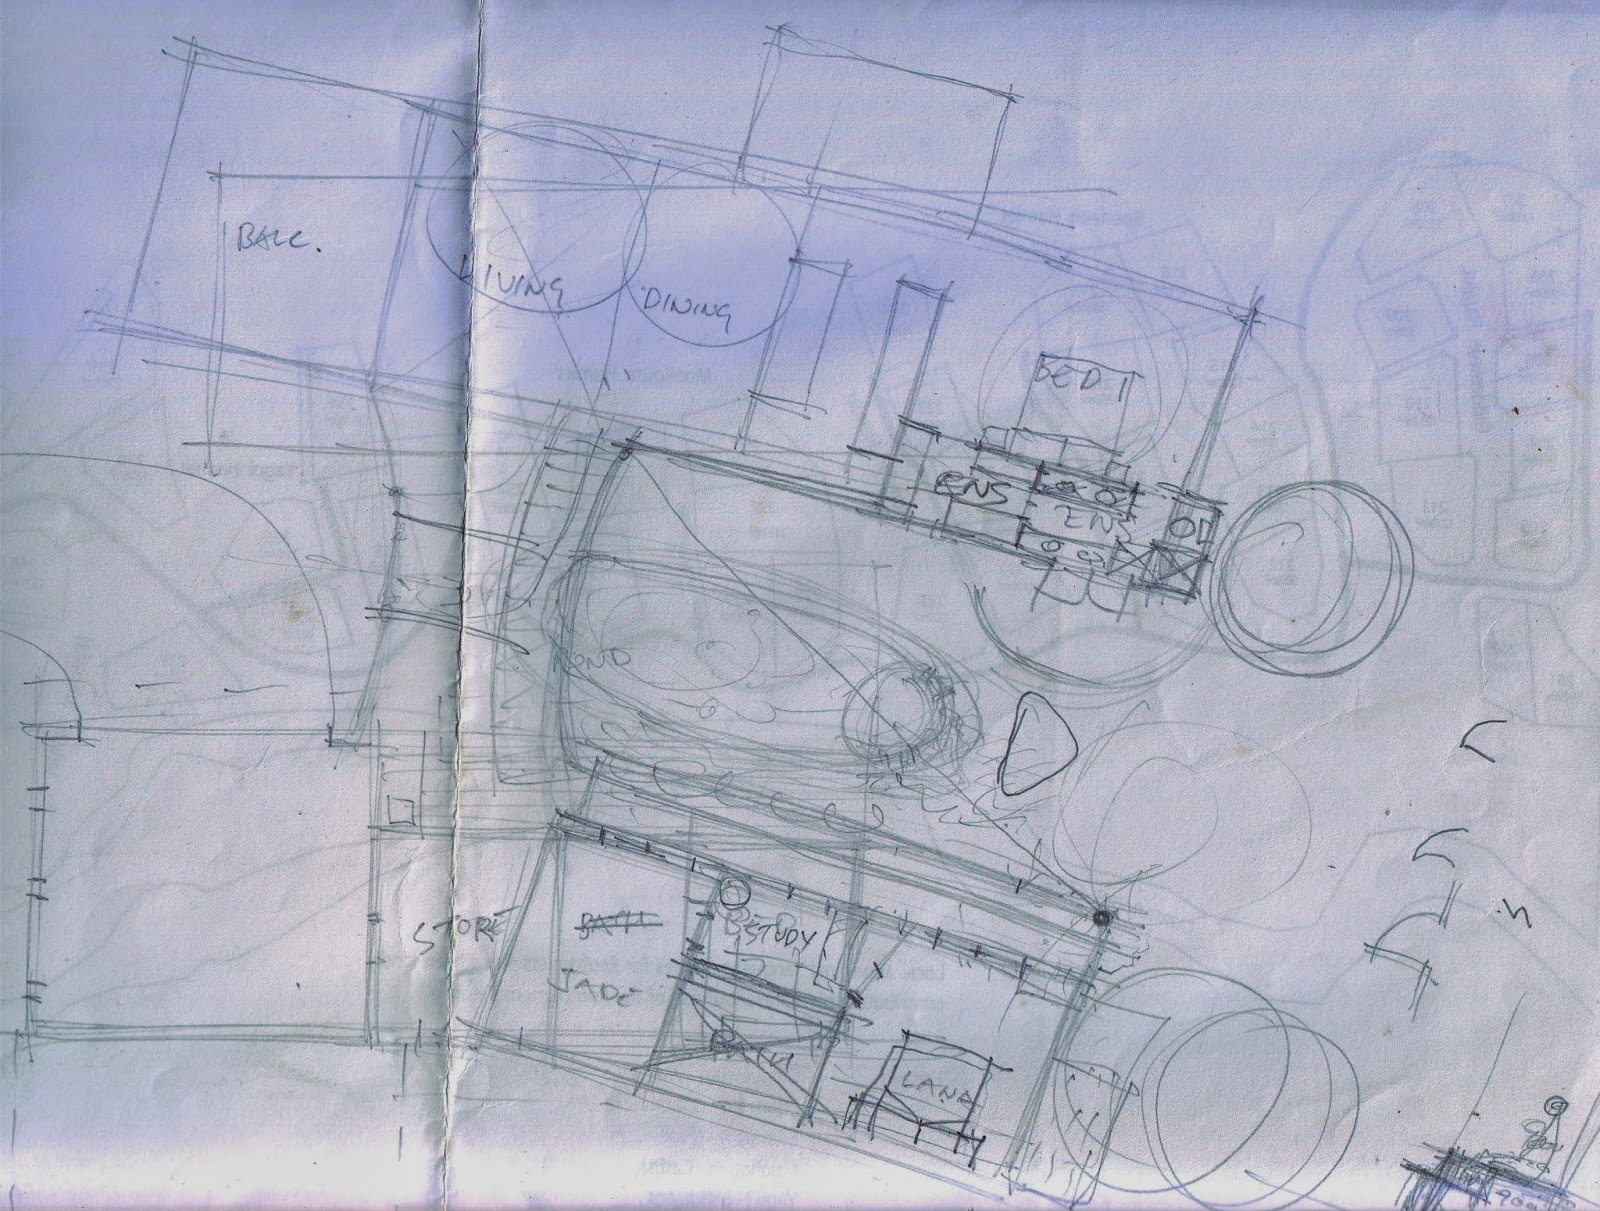
Excuse the angle of writing, but it's the same house design, starting to harden up.
Solid lines are drawn, contours and levels shown. Garage has turned into a carport and angle of access has changed. Using cupboards as columns to hold the roof up. Office layout has changed. Dining room has become round with a curved wall separating the entry. A concrete water tank has become the dining room floor. A day bed has been added in front of the dining room, and a small balcony.

Now for the section. This is a cross section taken through the land and building to show that it sits on the block with minimal excavation and to make sure the design works thermally. I need to ensure that the summer sun doesn't penetrate the windows and the midday winter sun does. If the midday winter sun gets in then it will the rest of the day as it is a lower angle. This will warm the house all day, hitting the thermal mass walls (shall explain in another blog) and then releasing that warmth at night. Notice the winter sun hitting the sides of the concrete water tank which is our dining room floor.

Next I have proceeded to put all the walls into the computer. BUT I am still not happy with it.
back onto the drawing board to work out some more changes. I have placed some tracing paper over the computer drawing and have started to straighten the south pavilion up as it was too complex and would be expensive. Am starting to design the landscaping also.
Have removed the laundry from my office (that was never going to work) and it is now in the study which is now actually a massage room where my wife does amazing Kahuna massages. Which was by the way going to be the kids hang out area (sorry kids, they'll have to hang out with us :)

There are still more changes to come but the rest are done in the computer and that is for the next blog.
So for now, thanks for reading and I hope you have gleaned something from it.
You can learn more about what we do and see samples of my designs on our website http://www.willcollinsdesign.com.au and http://www.goldcoastbuildingdesigners.com.au
or our business facebook page:
https://www.facebook.com/WillCollinsDesign and https://www.facebook.com/Goldcoastbuildingdesigners or follow us on Instagram Gold Coast Building Designers.
https://www.youtube.com/user/willcollinsdesign/feed?activity_view=3 My You Tube channel.
#Designersofresidentialarchitecture#luxurysustainablehomes
#apartmentcomplex's#ecoresorts#spiritualresorts#wellnesscentres
#houseadditions#renovations#housealterations#duplex's#townhouses
#ecovillages#lightindustrial#commercial#industrialstyledwellings
#ruralstylehouses#resortstylehomes#steeplandspecialist#draftingservices#
pavilionhouses#slopingblockdesigns#openplan#ecodesigns#dreamhomedesigns
posted by Unknown @ 16:10
1 Comments
![]()


